

Appearance
JavaScript Example: Validation and Saving
Designer › Logic › Custom JS
This example builds an expense request form that:
- Checks the amount and the dates, and shows an error under the field when something is wrong.
- Requires a receipt for larger amounts.
- Has a Save draft button that saves without closing the form.
- Has a Submit button that runs a workflow action.
For each method used here, see Using the JavaScript API in Logic.
You need a form with these fields:
| Field | Type |
|---|---|
Amount (Amount) | Number |
Start date (StartDate) | Date |
End date (EndDate) | Date |
| Attachments | Widget |
and a workflow with a Submit action.
Step 1: check the amount and the dates
Errors must update as the user types, so add a Continuous rule with a Custom JS step:
js
// Amount: required, more than 0, at most 5,000
const amount = getNumberFieldValue("Amount");
if (amount === undefined) {
  setErrorMessage("Amount", "Please enter the amount.");
} else if (amount <= 0) {
  setErrorMessage("Amount", "The amount must be more than 0.");
} else if (amount > 5000) {
  setErrorMessage("Amount", "Requests over 5,000 need a different process.");
} else {
  setErrorMessage("Amount", "");
}

// Dates: the end date can't be before the start date
const start = getValue("StartDate");
const end = getValue("EndDate");
if (start && end && end < start) {
  setErrorMessage("EndDate", "The end date can't be before the start date.");
} else {
  setErrorMessage("EndDate", "");
}
How it works:
setErrorMessage(field, text)shows the text under the field. While it's shown, the form can't be saved.setErrorMessage(field, "")removes the message. Every case ends with a message or with"", so a message never stays after the user fixes the value.- In a Run once rule the message would be set once, when the form opens, and would stay until the form is reopened. That's why this is a Continuous rule.
Step 2: require a receipt for amounts over 100
Add this to the same step. Replace "attachments-widget-id" with the ID of your Attachments widget: select the widget in the designer and copy its ID from the properties panel.
js
const files = getAttachments().filter(file => file.state !== "deleted");
const needsReceipt = (getNumberFieldValue("Amount") || 0) > 100;

setErrorMessage(
  "attachments-widget-id",
  needsReceipt && files.length === 0 ? "Please attach the receipt." : ""
);
Saved files that the user removed are still listed, with state: "deleted", until the item is saved. So the code skips them.
Step 3: a Save draft button
Add a Buttons widget with a Custom Button labelled Save draft, and give it this code:
js
saveForm({ exit: false })
  .catch(error => showMessage("Couldn't save: " + error.message, "error"));
If a field has an error, nothing is saved and the user sees which fields to fix. When the save works, the form shows it the same way as for the normal Save button.
There's no "Draft saved." message on purpose. saveForm finishes as soon as saving starts, and also when errors block the save, so a message in .then() would appear even when nothing was saved. .catch() runs only when saving can't start at all, for example while the form is still loading.
Step 4: a Submit button
- In the workflow designer, select the Submit action and copy its ID.
- Add a Custom Button labelled Submit with this code:
js
const amount = getNumberFieldValue("Amount") || 0;

if (amount > 1000) {
  showMessage("Requests over 1,000 must be approved by your manager first.", "warning", 8000);
} else {
  executeAction("paste-the-submit-action-id-here");
}
executeAction saves the item, runs the action, which moves the item to the next status, and closes the form.
A standard Action Button does the same without code. Use executeAction when you need your own checks first, as here.
Test it
- Open the form and type a negative amount: the error appears under Amount.
- Set an end date before the start date: the error appears under End date.
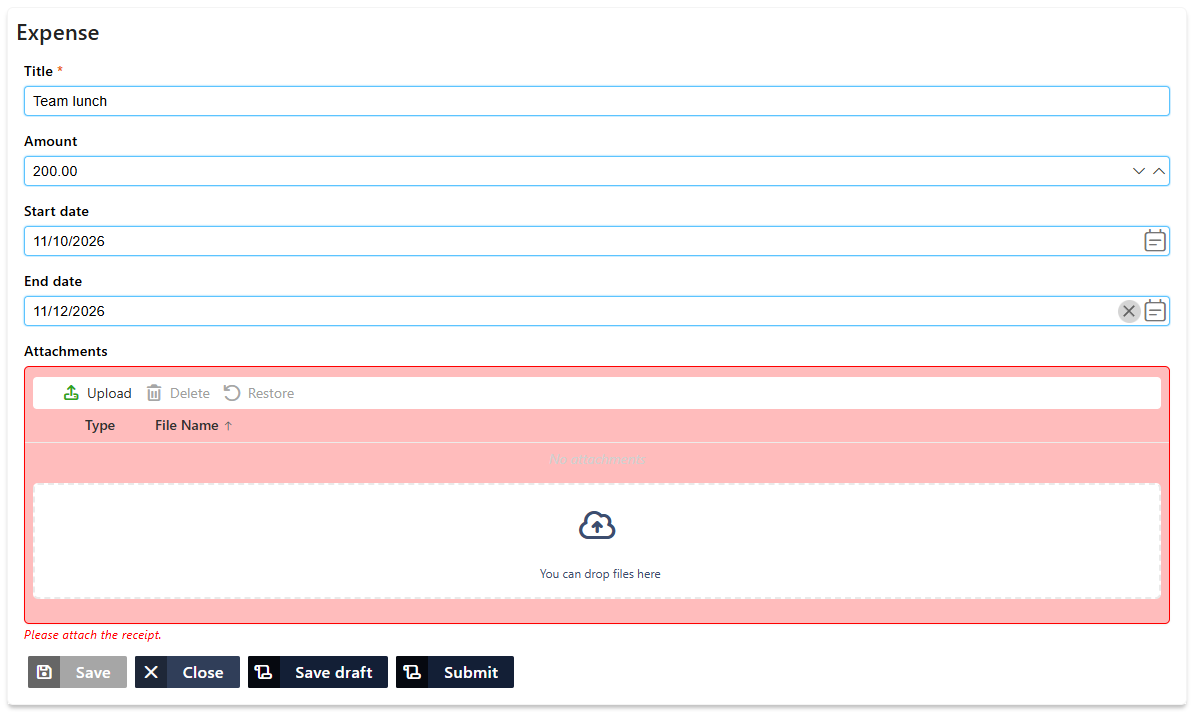
- Enter 200 without a file: the Attachments widget asks for a receipt.
- Fix everything, select Save draft, then Submit.
Step 3 of the test, before the file is attached:
If something doesn't happen, see Troubleshooting JavaScript.
Related: JavaScript Example: Working with Related Lists, Workflow Actions.