

Appearance
How to Configure Workflow Email Notifications
Designer › Workflow › a status or an action › Notifications
Your workflow can send emails by itself, for example to tell the requester that their request is approved, or to tell a manager that a request waits for them. There are two kinds:
| Set on | Sent when | Goes to | |
|---|---|---|---|
| Status email | A status, for example Approved | The item reaches that status | The people you choose |
| Action email | An action, for example Approve | The action becomes available, that is when the item reaches the action's status | Everyone who can do the action |
There is no email for "an action was done". Use the email of the status the action leads to. For example, an email on Approved goes out when someone approves.
Set up a status email
- In the Workflow tab, select the status, for example Approved.
- Under Notifications, turn on Send Email.
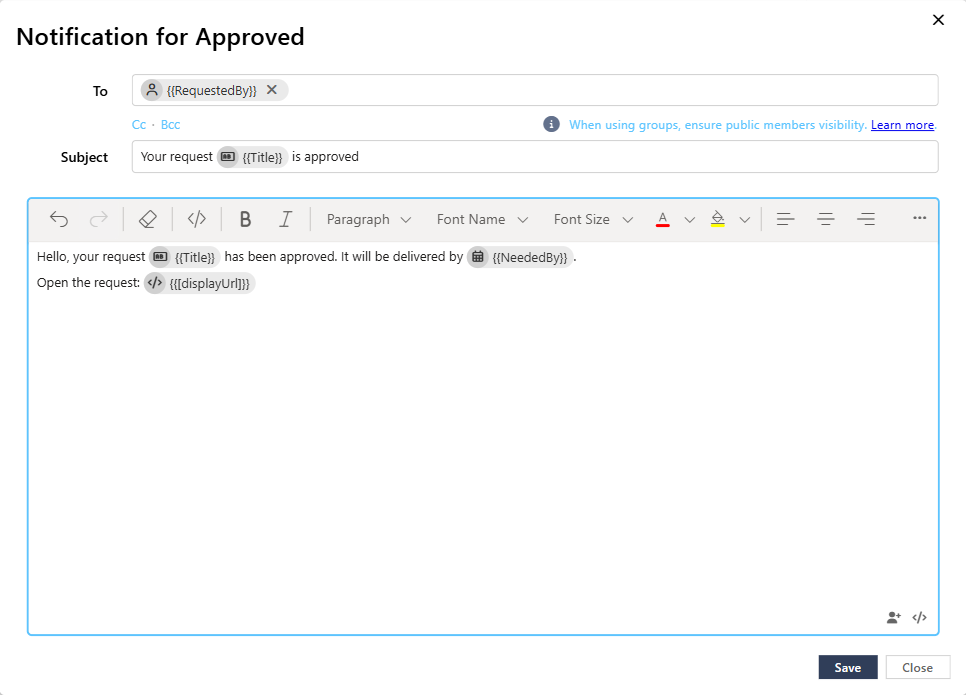
- Select add email. The editor opens, titled Notification for Approved.
- Fill in To (Recipients), Subject and the text (Subject and text), then select Save.
- Save the form.
Without the email from step 3, nothing is sent, even with Send Email on.
Set up an action email
- In the Workflow tab, select the action, for example Approve.
- Under Notifications, turn on Send Email and select add email.
- Write the subject and the text, then select Save. Save the form.
To is fixed, and says Email will be sent to all action assignees. You can add people under Cc and Bcc.

Action emails work only when the action's audience is Specific users. For a Public action there is no list of people, so Send Email is greyed out, with the note It is not possible to send email notifications for actions that are publicly visible. See Workflow Actions.
Recipients
In To, and in Cc and Bcc (select Cc or Bcc under the box to show them):
- Type
@and a name to add a person or a SharePoint group, for example@Finance Team. - Type
{{to add a people field of the form, for example Requested by, Line manager or Created By. The email goes to whoever is in the field on that item. - A text field that holds email addresses works too. Separate the addresses with
;or,. - In the same
{{list,[externalUsers]sends the email to the item's external users. - Type an email address.
The two small buttons at the right of the box do the same as @ and {{.
If you send to SharePoint groups, set them so that everyone can view their membership. See Using SharePoint Groups.
Subject and text
Type {{ in the subject or the text to insert a value from the item. Pick a field of the form, or one of these tokens:
| Token | Inserts |
|---|---|
[now] | The current date and time |
[today] | Today's date |
[displayUrl] | A link to the item in view mode |
[editUrl] | A link to the item in edit mode |
[formStatus] | The item's current status |
[latestComment] | The comment of the action that moved the item to this status, with the name of who wrote it |
[attachments] | Links to the item's attachments (not in emails to external users) |
[pdfUrl] | A link to the PDF export of the item |
[workflowHistory] | A table of the item's workflow history: date, event, name, performed by |
[externalUsers] | The email addresses of the external users who have access to the item |
In the subject, [formStatus] is the only one of these tokens you can use. Fields of the form work in both. In the subject and the text, @ only types a person's name. It doesn't send them the email.
Example text: Hello, your request {{Title}} has been approved. It will be delivered by {{Needed by}}. Open the request: [displayUrl]. In the email, each token is replaced with the item's value:
- People show by name, lookups by the item's label, and Yes/No as Yes or No. Several values are separated by commas.
- Other fields, such as dates, numbers and choices, look as they do in the SharePoint list.
- In Created By and Modified By, a person who used an external form shows with their email address and [external], for example alex.morgan@example.com [external].
- An empty field gives nothing.
The text editor has the usual formatting: bold, italic, fonts, colours, alignment, lists and tables.
Good to know
- Notifications in Settings → Email notifications turns all emails of the form on or off. That includes workflow emails, conversation emails and external access emails. Check it if no emails arrive. See Settings Tab (Overview).
- The emails come from the Sintel Apps address, or from your own mailbox. See Custom Emails.
- Emails also go out when an action is done through the API, for example by a flow.
- A new item reaches the initial status when it's first saved. Its status email goes out then.
Best practices
- Keep subjects short and easy to search, for example Request {{Title}}: approved.
- Don't send to large groups when one person is enough.
- Use tokens instead of typing values by hand.
- Test the emails in each status. Do the actions yourself on a test item.
Related: Workflow Statuses, Workflow Actions, Custom Emails.