

Appearance
Upgrading from Sintel Forms to Sintel Apps – Migration Guide
Moving from Sintel Forms
This article explains how to upgrade an existing Sintel Forms configuration to Sintel Apps.
The upgrade process imports your existing form configuration into the new designer and rebuilds the form structure on the same SharePoint list.
It’s important to highlight that the upgraded form does not go live until you save the form in the new Sintel Apps Designer.
Before You Start
Before beginning the upgrade, ensure that:
- You have Full Control permissions on the SharePoint site.
- There are no critical Power Automate Flows currently running.
Finding Existing Sintel Forms
If you are unsure how many Sintel Forms exist on your tenant or where they are located, you can quickly view them using the Sintel Forms (classic designer).
1. Pre-Upgrade Requirements
These steps must be performed for each form template before April 2nd 2026
Before running the Sintel Apps Pre-upgrade check we recommend you use the Sintel Forms Designer to prepare each of your forms.
- Make sure the form has the threshold prevention feature enabled
Sintel Forms Designer → Settings → Basic Features → List View threshold Prevention → Start
- Ensure all form fields are present on the form layout
Sintel Forms Designer → Layout → Existing Fields → Auto-layout
You can then hide this section.
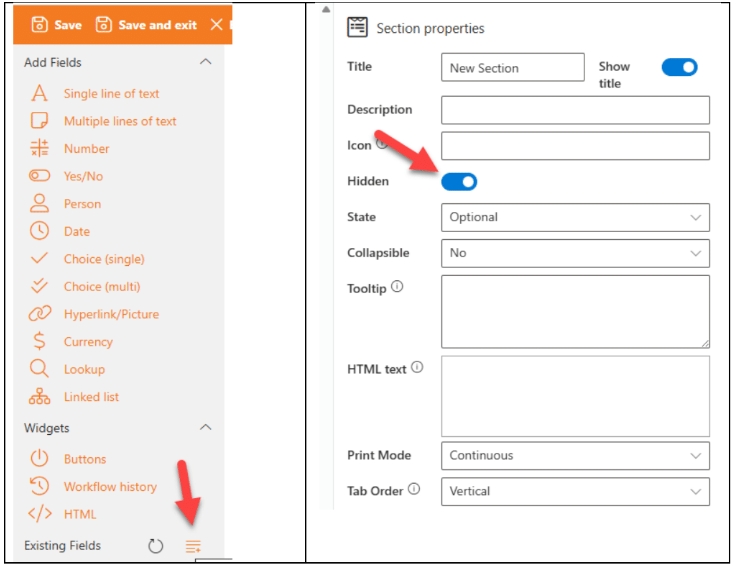
Save the changes
These steps are required to ensure that your form design is updated to the latest version and that all fields that may be referred to in your logic, are present on the form layout.
2. Install the New Version of Sintel Apps
Add the Sintel Apps application to your SharePoint tenant and deploy it.
Once installed:
- Create the Apps page on your SharePoint site.
- Open the Sintel Apps page.
- Select the list containing the form that you wish to load in Sintel Apps.
3. Run the Pre-Upgrade Check
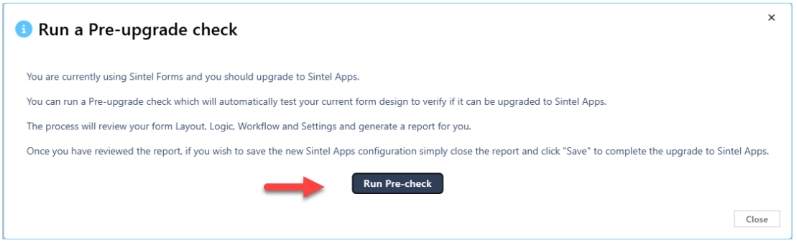
As soon as your form is selected, you will be prompted to run the Pre-upgrade check.
The upgrade wizard will run a pre-upgrade check which reviews the entire form configuration and generates a report.
The process will perform the following steps:
- Read the existing configuration
- Rebuild the form layout
- Recreate logic rules
- Recreate workflow configuration
- Apply settings
At this stage the form is rebuilt in the new designer as a preview only and the Pre-upgrade results report is generated
The report may contain:
-Information Messages
These simply confirm that checks were performed successfully and can be ignored.
-Warnings and Errors
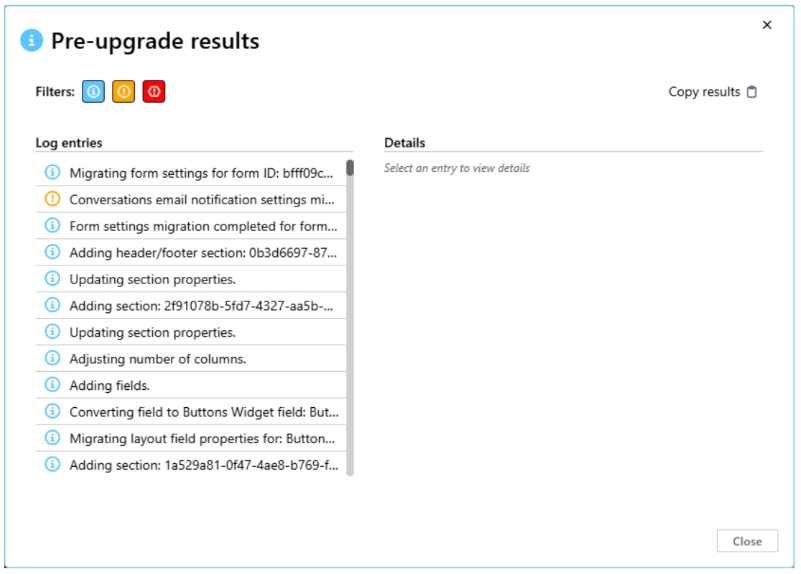
Any warnings or errors that are displayed need to be addressed before proceeding.
Once they are addressed you can re run the Pre-upgrade check again using the following steps:
- Close the report.
- Refresh the page to trigger the Pre-upgrade check again.
- Verify that all warnings or errors are resolved.
4. Apply the upgrade
When you are happy that all the items have been addressed and your form is ready to upgrade you can proceed to apply the upgrade by clicking on Save. This will activate the upgraded Sintel Apps configuration on your list and Sintel Apps will replace Sintel Forms.
5. Post-Upgrade Steps for old forms (optional, depending on the age of your forms)
Forms created before October 2021 may still store historical workflow data in a legacy list: SintelFormsWorkflow_<guid>
Although this list is no longer used, you may want to preserve its data.
Resolution
We created a Power Automate Flow to copy historical workflow records into the main form list.
To use it:
- Download the provided solution.
- Import it into your Power Automate environment.
- Configure the three environment variables.
- Run the flow against the form list.
See: Migrating Workflow History Using Microsoft Power Automate
6. Rollback options
If for any reason you need to roll back to the Sintel Forms configuration, this can easily be achieved using the following steps
- Launch the Sintel Forms Designer
- Click Save
- This will reactivate the Sintel Forms configuration on your list and Sintel Forms will replace Sintel Apps.
Swapping between Sintel Forms and Sintel Apps is as simple as launching the Sintel Forms Designer or Sintel Apps Designer and clicking Save.
7. Typical Upgrade Warnings or Errors
Conversations email notification settings migration is not supported yet
Explanation
The Conversations feature in Sintel Apps will send notifications when users are mentioned which is the same behaviour as Sintel Forms, but unlike Sintel Forms, you are currently not able to customise the email that is sent by Sintel Apps.
Some PDF settings could not be migrated
Explanation
The feature to defining the naming convention of PDF files which was available in Sintel Forms has not yet been released for Sintel Apps.
Unsupported step encountered during migration in rule ID: XXXXX
Explanation
Rules containing unsupported steps will be converted into JavaScript placeholders. These rules will be marked with the prefix: [VERIFY]
You must review the JavaScript to ensure it works correctly in Sintel Apps.
Refer to the following articles:
- JavaScript API Differences Between Sintel Forms and Sintel Apps
- Migrating Workflow History Using Microsoft Power Automate
The ‘Disable or hide features’ step with ID: aa52cdfb-3e0d-405d-8950-25efab9bf78a in rule ID: 23a8a372-8527-4d2d-9418-43148422f307 attempts to hide or disable the External Users section, which is not supported yet. This setting will be ignored.
Explanation
Sintel Forms contained a step named “Disable or hide features”. The step included 9 options but Sintel Apps only supports 7 at this time. External Sharing and Item history are not supported yet.
Target field <unknown> is not in default view. Falling back to ‘Title’ or ‘ID’.
Explanation
If your form uses lookup fields that are configured to retrieve additional columns, those fields must be visible in the default view of the lookup list. Add the missing columns to the default view of the lookup list and re-run the upgrade check.